


Topic: New Modes (and Maps)
Hello, I'm Evgeni and I'm new here.
I have some ideas for new Modes that can spice up the gameplay. (And even more ideas for maps!)
Here is a list:
- Advancement Mode
Possible Maps: Endor: Advancement, Hoth: Tactical Op
- Prison Break Mode
Possible Maps: Lusankya
- Training Mode
Possible Maps: Carida: Academy, Kolaador: Pilot Training Center
- Survival Mode (or Timed Mode)
Possible Maps: one of the maps in Endor: Advancement, maybe some more (if I manage to make up)
- Objective Mode:
Possible Maps: Blenjeel: Crashlanding, Rebel Surveillance Post, some maps in the Hoth: Tactical Op series, Bespin: Evacuation, Tralus: Supplies, Brelor: Assault on Dodonna's mansion
- Deathmatch:
Possible Maps: Abregado-Rae: The Old Patch, Space Coruscant: Liberation of Coruscant
- Duel:
Possible Maps: Tatooine: Mos Eisley Spaceport, Hyperspace: The Millennium Falcon, Yinchorr: The Squall, Coruscant: The Galactic Museum, Ylesia: Stormy Dogfight
- Team Duel (Elimination):
Possible Maps: I'll think of some. But probably those of the Duel Mode will do just fine, maybe to somewhat expand them in some cases (at most).
- Stealth:
Possible Maps: Can't think of some right now. But I will! Eventually...
And I'd love to see it, but I doubt it's possible: Race (like pod race, starfighter race, swoop race, etc.)
Possible Maps: Tatooine: Boonta Eve Classic, Malastar, Ord Ibanna,... countless others (and those are just for pod racing!)
So, here's an explanation for each Mode and each of the maps (listed as Possible):
1) Advancement Mode - a series of small maps. You need a Victory in the map to advance to the next one. Victory is achieved by reaching the goal (for the Endor map usually the players need to cross the map from point A to point B). Or to destroy something (like a turret, communication station, etc.). Or to do something else.
There are two teams: the defending force have unlimited tickets (or very high number of them if unlimited is impossible), but the force they have on the field is a lot less than the attackers. On the other hand, the attackers have a larger force on the field, but have limited number of tickets. And the tickets are persistent. So, if in the first map of the series the attackers have 100 tickets and to accomplish it they have used 10 tickets (died 10 times), the next map they have 90. But if they died 40 times, then they'll have remaining only 60.
And here's the main goal - for the attackers - to achieve Victory on the last map and win in every previous map; for the defenders - to prevent the attackers doing their Objective(s) and drain their tickets.
Brief description on the possible objectives:
Attackers must cross the map from point A (CP A) to point B (CP B):
There are three CPs (at least) - one for the attackers, one goal to reach, and one for the defenders (usually between the other two CPs).
There are two possibilities I can think of on how to do that: First, everyone on the team must cross the map (which I think might be quite impossible and that's why I favor the second option) or... Second, a maximum number of people should cross the map (using the ticket system). And this is how it's done: when the attacker reach the designated area, he respawns again in the starting point and 1 is added to the people who reached that area and 1 is subtracted from the ticket system (i.e. he dies). When the round finishes, the number of remembered tickets (people who reached the goal) is taken and used for the next map. If it's > 0 - Attacker's victory on the current map and they advance to the next one or win if it's the end. If it's not (=< 0), then it's defender's victory.
Other objectives might be - destroy a target(s), kill a target(s), or other Objective (taken from the Objective Mode). And might be used together with move from point A to point B.
Possible Maps:
Endor: Advancement
Story: It's just before the Battle of Endor, when the Rebels try to reach the Imperial Shield Generator, guarding the Second Death Star. But before they have a chance to destroy it, they must first make way to it... unnoticed. Meet the Heroic Rebel Strike Team and their small skirmishes to reach the Imperial Shield Generator.
Of course, with every next map it will be harder for the attackers to achieve their goal(s).
Description:
It's a composition of a number of small maps, most of which are to cross from point A to point B. A couple of them might have a different Objective: destroy a sensor station. Of course the maps are in a Forest environment. The last map of the series might even be in the Shield Generator, where the Rebels must overcome the Imperial last stand and blow-up (with a nice thermal detonator) the generator itself.
Possible Maplist (Note: All maps are TINY!):
(1): Forest - cross from point A to point B. The map is basically open.
(2): Forest - destroy the Comm station and the Sensor station, before the Imps can send a message to their base and expose the Rebels. Again an open landscape.
(3): Forest - same as (1), but the there are only two or three paths leading to point B.
(4): AT-ST - Destroy the Imperial AT-ST walker.
(5): Bunker Entrance - Survive 3 minutes, while your teammate tries to open the door. The Imps spawn at a number of CPs and attack in waves (using bots for the extra Imps!).
(6): Inside the Bunker - Cross the corridors from point A to point B to reach the Generator room.
(7): Generator Room - destroy the generator. A grenade, rocket, anything that says KABOOM will do.
Hoth: Tactical Op
Story:
The Battle of Hoth. You and your highly trained team is sent to a critical mission - to assure the destruction of the Rebel Shield Generator.
Description:
Basically the same as Endor but this time it's the Imperials who are attacking and the Rebels defending.
Since it's a longer series, the Imps have a lot of tickets.
Possible Maplist:
(1): Hoth - cross the map (A to B)
(2): Hoth - cross the map (A to B)
(3): Hoth - cross the map (A to B)
(4): Trenches - kill everyone in the trenches (more Rebels than Imps - again bots)
(5): Turrets - destroy the three turrets (or more turrets?). The Imp AT-AT is also shooting in this area, so be careful!
(6): Aproaching the Shield Generator - just like cross the map (A to B), but in the middle of the crossing, the Generator is destroyed by AT-AT and the mission is changed - attack the Rebel Base (cross the map from A and B to point C)
(7): Hoth (Approaching Echo Base) - cross the map (A to B)
(8): Inside Echo Base - cross the map (A to B) - minimal resistance.
(9): Command Room - Kill every Rebel. (The Rebels have evacuated, so there's no one here.) Additional objective - turn off the Ion Cannon.
(10): Inside Echo Base - cross the map (A to B) - a little bit more resistance.
(11): Hangar - kill everyone and/or destroy the transport(s). With lots of bots, of course!
2) Prison Break - this mode is very similar to cross the map in the Advancement mode.
The prisoners rebel and try to escape. The guards try to stop them. The prisoners have more tickets but poor equipment, while the guards are few, but have better equipment.
The prisoners will win if enough of them manage to reach the escape zone (ANY escape zone!). When one reaches it, he will score a point and return to the starting position (i.e. he dies).
The guards need to stop the prisoners to reach their quota. For example, if 10% of the prisoners reach the escape zone - the guards lose. But if they prevent it - they win.
There need to be a number of escape zones otherwise all of the guards will defend the only one and no prisoner will be able to make it.
The difference from a push map (Endor Strike Team) is that there are no CPs in between, there are multiple escape zones (any escape zone will do for prisoners!), and they score once they approach it right away - no waiting to capture it. Oh, and neither team can capture them - they are not spawn points.
As I wrote, the prisoners lack equipment and good weapons. They might also have limited ammo. And it will be fun if they can grab the ammo and weapons from the dead guards - that would be cool!
Also, it will be the best if the minimap can be blocked for the prisoners, i.e. they don't know the layout of the prison. Of course, the guards will have the minimap. If it can be done and the Lusankya map can be done as I see it, then this will play a major role.
Possible Maps:
Lusankya - ispired from the book "Wedge's Gamble"
Story:
After the successful escape of Corran Horn, the prisoners decide it's their time. They manage to kill some guards and take their weapons and now the road to freedom awaits them. Only if the Imperial stormtroopers didn't have anything to say about that, the escape would've been so perfect...
Description:
The map is made of two main parts - the first one is the Lusankya itself and a cave system.
- The Lusankya is where the prisoners start.
- At the far ends of the cave system is where the exit point are.
The Lusankya and small parts of the caves (near the exit of Lusankya) are always the same. The interesting part comes after that. I want the cave system to be generic, like a sandbox. When the server loads this particular map, it will also create it. It will use pre-made blocks (or chunks) and arrange them randomly, making a labyrinth. That would create a new experience every time you play (especially for the prisoners).
Also, in the book Lusankya is upside down (as far as I remember), so is it possible to change the gravity in some parts of the map? (I somewhat doubt it but I needed to ask...)
I'm sure you have questions about this Map (or Mode), so ask them.
3) Training Mode (or Practice Mode) - mostly singleplayer, although multiplayer is also possible and welcomed.
Here's what these maps might have:
- Shooting Practice - you choose a weapon and then start shooting at holographic targets: various distance, some static, other moving or hiding and popping out. Some entirely exposed, while other are behind cover or crouching/lying on the ground.
You can shoot while standing, crouching, or even moving.
- Grenade Practice - practice throwing grenades at targets or at the designated area. Again - from various distances, while moving or staying in one place, or from cover or around corner (bouncing the grenade in a wall) where you don't have direct visibility
- Driving and piloting skills.
- Learning to use the equipment.
- Beginner and Advanced battle tactics.
- Offense and defense strategy and tactics.
- Learn to play with the different classes.
- Learn to use covers, make ambushes, clear areas (like buildings), etc.
- Teamplay (multiplayer ONLY) - learn to play with teammates and learn to support and cover each other. Synchronize attacks and defense. And more (probably...). That's probably the most important part - I believe many players are playing the game mostly solo. Of course, they'll help a teammate if they can but that's it. I hope to raise it to the next level, where players really are working together to achieve victory (like in the real military and Task Forces).
This Mode is notable in a sense that it has no win or lose option and has no time limit.
Possible Maps - any Imperial and Rebel Training Facility will do. The two which I gave - Carida: Academy, Kolaador: Pilot Training Center - are just two of them.
4) Survival Mode (or Timed Mode) - The maps are usually small ones - no need for big. The defenders need to survive for some time and not allow their tickets to run out. The attackers must dry the defender's tickets before the time runs out.
The defenders are in smaller number and have some cover and are usually placed in the center of the map, while the attackers have infinite tickets and surround the defenders.
Another way to win/lose is for the attackers to capture all defender's CPs (Usually just one or two and in close proximity).
There's also a possibility that it's played in waves as well. Normal players play the normal way, while the bots attack in waves, each wave stronger than the previous.
Also, parts of this mode can be combined with other modes (although it won't be Survival anymore). For instance - defend your base long enough and then proceed to the landing platform for evacuation.
Possible maps:
Some of the Advancement Mode's maps. And there's always possibility for more (like Yavin or Hoth, where the Imperials attack in masses and the Rebels must Survive as long as possible).
5) Objective Mode - to win the game, each team must accomplish their tasks while preventing the enemy to do theirs. It's possible to have not just one but many objectives and to have a time limit.
Normally the order of accomplishing the tasks doesn't matter, but successfully doing one task might prevent doing the another and so the game might be lost. Or doing one task might accomplish another one as well.
It's a tie if neither team manages to accomplish all their objectives.
Here's an example scenario (a little bit poor, though):
The Rebels board an Imperial starship. Their objective is to assassinate the Imperial Moff on-board, transmit a valuable data from the servers, and blow-up the ship.
If the Rebels first blow-up the ship, they'll succeed into killing the Moff as well, but they won't be able to transmit the data, so they lose. On the other hand, the Imperials fail to protect their ship and the Moff, so they lose as well.
In the end, it's a tie.
The example ends!
It's possible to have primary and secondary objectives. Primary - must be achieved! Secondary - they're not necessary for the victory (or only a portion of them must be accomplished). (But I have no idea what bonuses might they give in return for accomplishing them. At least for now...)
Here's a list of objectives (later I might think for more, but for now those are all):
- Destroy Target(s) - to accomplish this objective, the Target (or Targets) must be destroyed by any means possible. Possible Targets include, but not limited to, ships, power generators, turrets, etc.
- Kill/Assassinate Target(s) - there is someone, who must be assassinated. The target doesn't respawn once killed. The target might be a bot as well as a player and must be kept safe - once dead, there is no second chances! Also, if the objective is to kill all enemies, they will not respawn again. And if the task is to kill all enemies, then it can be played only on very small maps (like those in Advancement), because otherwise finding the last remaining enemies on a big map might be very hard (especially if the other team also doesn't have many players remaining).
- Capture Target(s) - it has two options. If it's a vehicle (most often), it must be then delivered to a designated area(s). If it's another object (unmovable), then it should be protected for some time after the capture. For instance: capture the Ion Cannon (and turn it off) and then defend it.
- Steal/Transmit Data - reach the designated computer terminal. Then it will diverge itself. If the goal is to Steal the Data, you must upload the Data to your datapad and return with it to the designated area. If it's Transmit - you must stay in front of the computer while it's transmitting the Data, making you vulnerable to enemy attacks.
- Defend/Protect Target(s) - the opposite of Destroy/Kill/Capture Target(s) (or Steal/Transmit Data). Basically, this is the goal of the other team.
- Put a Beacon(s) at the Target(s) - the Beacons are later used to navigate an Orbital Bombardment or a Bombing run. The Beacon need some time to work and it might be deactivated (or destroyed?), making it essential task to guard it after the placement.
- Go to Area(s) - basically, this is for Advancement mode. Or to be part of a map with more tasks. To accomplish this you must go to the designated area (or one of the areas). An example scenario (more complex than those in Advancement) would be to invade the enemy's fortress, accomplish what tasks need to be done there, find the enemy's defense control room and deactivate the automatic Anti-Air turrets, guard the place, and when the transport lands in the landing pad, to quickly go to the transport and evacuate.
- Escort Target(s) - just like the map "Escape from Hoth". The Target might be a ship(s), vehicle(s), person(s), even an important object(s) like a datapad with classified information (Death Star plans, anyone?).
Possible Maps:
some maps in the Hoth: Tactical Op series (and the Endor too!)
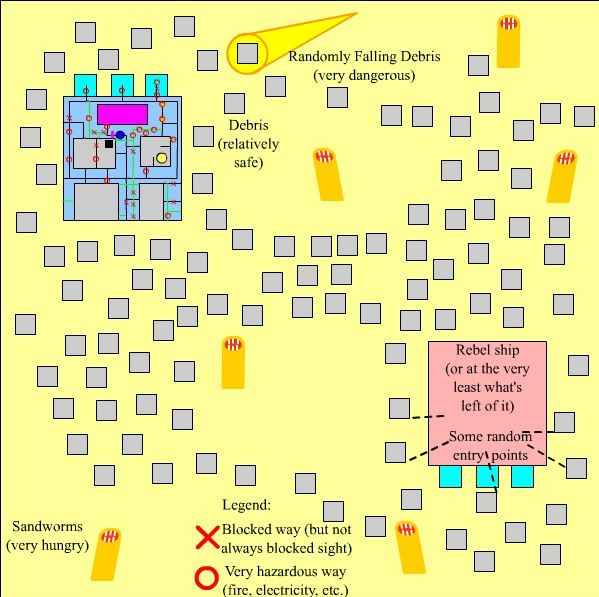
Blenjeel: Crashlanding - Blenjeel a level in Jedi Knight 3: Jedi Academy, from which it was inspired. This map is infantry ONLY.
Story:
After a battle with the Imperials, three Rebel CR90s are making repairs over Blenjeel – an uninhabited desert planet. An Imperial Carrack-class light cruiser stumbles upon them and attacks. With damaged hyperdrives and unable to jump to hyperspace, the Rebels are forced to fight for their lives. In the resulting battle two of the Rebel corvettes are destroyed. The captain of the third one, knowing that his ship will share the same fate, decides to ram the Imperial ship and take it with him to Oblivion. But instead of destroying each other, the two heavily damaged ships crash-land on the hostile desert of Blenjeel. And there the fight continues…
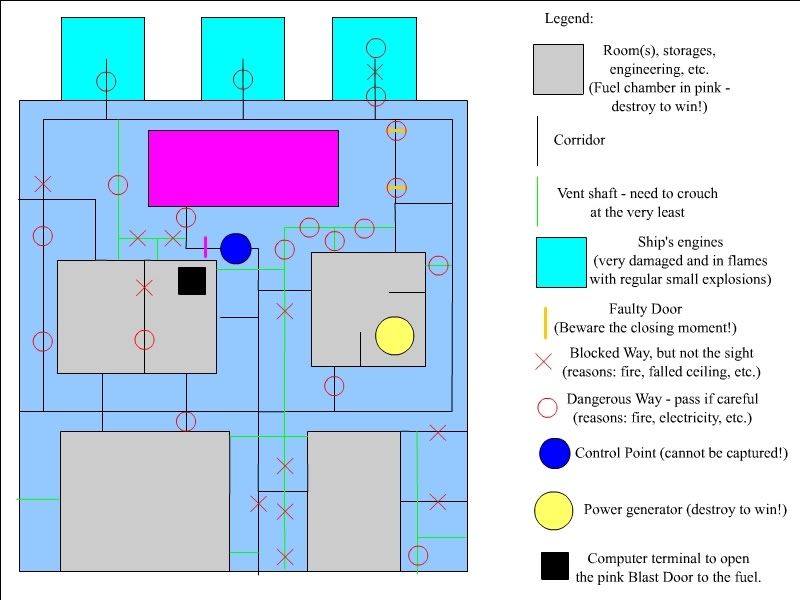
Description:
Two crashed ships – one Rebel and one Imperial, in the deserts of the Blenjeel. Both ships serve as the main bases. The objective is to destroy the enemy's ship or destroy the power reactor. One way to do that is to initiate a power overload in the enemy ship's main power reactor and blow-up what’s left of the enemy ship. The power reactor might also be blown-up, which will result in victory as well. A hidden possibility for victory is to ignite the fuel, which would result in the same outcome. The main reactor is easier to get to, but can take quite a punch and the overload takes time and can be canceled in the meantime. For the fuel – a grenade would be enough to ignite the volatile liquid, but the fuel chamber is beyond the enemy's CP and is a lot harder to get to, since it’s better protected.
Because of the fierce space battle and the crash-landing, the two ships are in miserable state – most of the ships is destroyed and scattered across the surface of the desert. Only the rear parts of the ships are relatively intact, where the engineering room is (and the main reactors), which serve as a base for each side.
If you remember JK3, this particular mission involved worm-like creatures (similar to those in “Dune” books) called sand burrowers. So, crossing the desert to get to the enemy’s ship is quite dangerous. Luckily, the remains of the two ships are scattered across the desert, which can be used as protection from both the worms and the enemy blaster fire. You just need to jump from one to another and minimize the time you spend on the sand.
Of course, when one of this giant worms eats you, you will die. So, the enemy's blaster fire is not the only thing that can kill you.
There are many access points to each of the ships because of the heavy damage they’ve sustained during the battle and the crash-landing.
There is just one CP for each team and it cannot be captured.
Overall

Hazards and cool stuff that could be done in this map (if possible):
- Worm-like creatures (Sand burrowers) like those in “Dune” novels/films that can eat you. Literally!
- You can make the entrance to the fuel chamber a little bit harder by making a door that’s locked and first you need to open it from the engineering (or some other part of the ship). Of course, the defenders might use the same controls to close it. This will make it a little bit more challenging.
- The corridors in the ships are taken damage as well – electric cables are lying everywhere and some can even electrify you, if you bump into them. Not to mention the missing floor and wall panels - electric cables in them too.
- Also, some of the automatic doors might not work properly, so they might open/close unexpectedly or be doing it constantly – you can shoot through them, but going through them is a little bit dangerous.
- If possible, you can try and randomize some of the secondary access points to the ships. For instance, the first time you play, there is a small opening near the engines, but next time you play, it’s closed. I believe this could be achieved by separating the ship’s mesh and the “opening”. The “opening” will have at least two states – “open” and “closed” and depending on the “state” it would choose which one to place in the “opening”. Since it’ll be a random number, the server must make the random number and then send it to the players in the beginning of the game (or when a new player joins the game) to be used as a seed. Then the map will be generated.
- Falling debris from space (from the two destroyed CR90s). When they fall (randomly!), they make a small explosion and everyone nearby will die (or at least lose some HP).
- CPs cannot be captured by any team.
Bespin: Evacuation - infantry and starfighters (and maybe other air vehicles).
Story:
Help Bespin citizens evacuate from the Imperial invasion. Time of the invasion - during the events of the game Jedi Knight 2: Jedi Outcast (although you can use another time - the Cloud City had retaken and lost the planet numerous times).
Description:
The Cloud City on Bespin (or at least small part of it). On three of the Cloud City's landing platforms three transport ships are being filed with citizens. At least two ships are in the sky as well – one Imperial and one Rebel. (Some other might be seen in the distance, but they won't play a role!)
The goal for the Imps is to destroy at least two of the Rebel transport ships before they load all of the citizens, take-off and escape. But the transports are guarded by three deflector shields – each one for each ship. So, they must take them out first, so the Imp fighters and bombers can then attack and destroy the transport ships.
The Rebel’s job is, of course, to protect those shields generators and, if by some chance, the shield on one of the transports is lowered, to protect the transport.
The shields can be taken care by two means – the easiest way is to use the control panel to lower the shield, but in this case it can be activated again using the same controls. The other way is to destroy the shield generator, which will be a permanent solution to the shield problem (remember Blenjeel?). But of course, destroying the generator won’t be easy and would require a lot of firepower and persistence.
Once the shield is lowered, the Imp fighters and bombers will attack the transport and try to destroy it before the shield is reactivated or it takes-off (when fully loaded). The Rebel starfighters will try to prevent that, of course.
When the shields are all fully loaded, the starfighters will be busy blowing-up each other and the Imp ship’s main cannons, which will be a real problem if the transports lift-off (if this cannons aren't taken care of, the cannons will definitely be able to destroy one of the transports before it reaches the escape zone and deal some damage to another).
So, there is a CP in each capital ship for finding a starfighter/bomber and go for a little romantic dogfight in the clouds and CPs for each side in the Cloud City, where the shield generators are. The Imps might have one or two of them, while the Rebels have just one in the middle of the three deflector shield generators (small and relatively short corridors lead to the rooms where those generators are). There might also be at least two neutral CPs which are in between the Imps and the generators. The starting CPs can't be retaken.
The loading time for transports is… say… 10-15 min. + some minutes to escape (enough for fully OK Imp cannons to tear apart one of the ships and to damage another one, but no more than that!). So, taking out as many cannons as possible is crucial!
I believe it will be a fun map to play since both the infantry and the starfighters have a real role to play which is basically mandatory. Relying in only infantry or starfighters will most certainly result in defeat. Also, the air battle is fun because in one moment the Imps are defending their ship, while in the other they are attacking the defenseless Rebel Transport. And the change might happen in just a couple of moments.

Hazards and cool stuff that could be done in this map (if possible):
- Separate air and ground battles, but each battle complements the other and is essential for the completion of the mission.
- Superior teamplay, tactics, and timed attacks are very important. It might give you the upper edge and bring you the victory.
- It will be fun if you can use smoke effects to make clouds – you can hide in them to ambush the enemy’s starfighters.
- The game has a time limit – a certainty that it will have an end… one way or another. 10-15 minutes to load the ships and then a couple of minutes for a daring escape! For that reason, the game has unlimited tickets for both sides.
- If you are an infantry, you can fall from the bridge(s). So, don’t try to fly, OK?
- Maybe cloud cars for transportation for the Infantry (like a taxi!). Just to sneak behind the enemy lines and attack the third Shield generator, which is beyond the Rebel's CP. Or a one-directional train will also do the trick.
- It will be cool if some of the Bespin's fauna makes an appearance: http://starwars.wikia.com/wiki/The_Wild … ield_Guide
- The Infantry can’t attack directly the Rebel transports. Or, maybe, make a window? Your decision! (But I think - better not!)
- The turbolaser fire from the capital ships will be deadly if you’re in the line of fire.
- Another possibility for the map is the Imperial ship's cannons to be constantly firing at the transports. And if a shield is down, then the laser will attack the transport directly. But I do NOT recommend it!!! It will shift the importance to the infantry - for the Imps to take out the shields ASAP in a rush. If the Rebels choose to spend some people on the starfighters, they won’t be able to destroy the cannons fast enough – at least one of the transports will be destroyed, because the ground troops won’t be able to defend the shield long enough. If the Rebels decided to try and pursue only air to destroy all cannons before that – the shields will be defenseless and will be very fast destroyed. Then the the Imps will hop in in the starfighters and finish the transports with the help of the few remaining cannons. The only solution will be to throw all forces into safeguarding the shields (and probably eventually they will fail!), making the air battle pretty much empty and useless.
Of course, the possibility of a useless air battle is still a possibility even with the way I described it, but it's unlikely – first, the Imps must be ready to attack the Rebel transports right away once an opportunity arises. Second the Rebels want to attack those cannons and engage the imperial starfighters for two reasons – first, to take out as much imperial air forces as possible, and, second, to entertain them so they might miss the opportunity to strike the transports or at least minimize their time shooting at the transports. Since the Imp ship is far away from the landing platforms, there is also a travel time. That’s why the air battle is very important!
And the ground battle is very important as well since it’s unlikely that the Imps will be able to destroy whole two Rebel transports if they haven’t done at least some considerable damage to them before. If, for some reason, they can – increase the number of transports needed to be destroyed: for instance all three, or even add another two Rebel transports and say: Imps, destroy three of the five Rebel transports to win the mission!
- If you don’t like Bespin, you can use Taloraan or another gas giant (with tibanna gas or without – like Ord Ibanna). But then you'll have to change the story a little bit.
- As a reason why ships will stay out of range – some of the Cloud City’s defenses might be in various hands, making it dangerous for big ships to approach (unless really big!). Or something between those lines.
- If it's the the battle mentioned in JK2: Jedi Outcast, then you can add some pirate ships and fighters in the distance.
Tralus: Supplies - underground map with Infantry and Vehicles. The mode is Escort.
Story:
The Imperials try to bring supplies to their base in the caves of the planet Tralus. The Rebels try to intercept the shipment before it reaches the well defended outpost.
Description:
The Imperials start at the one corner of the map and their aim is to transport the heavy truck(s) with the supplies to their fortress at the other end of the map. Of course the Rebels try to stop them by trying to destroy the truck(s). Both teams have ground vehicles (tanks, for instance).
Similar to the previous map described, Bespin: Evacuation, both the infantry and the vehicles play an important role. Neglecting one or the other will probably result in defeat. But unlike Bespin, the infantry and the vehicles can battle.
The only CP for the Imps is the truck(s) (and maybe another one – at the fortress, where they can have some “supply” of tanks). At the starting point (where the truck(s) starts), they have multiple tanks they can use. On the other hand, the Rebels have CPs all over the map and those which are at the main road have also ground vehicles they can use.
CPs can NOT be captured by any team.
Aside from the wide main way, which leads to the Imperial fortress (but definitely not in a straight line!), there are also many smaller caves for the infantry to use. Those caves are in two levels – the ground level, which is used mainly as shortcuts for the infantry (going in front or back of the convoy, as well as the sides) and for staging an ambush. The upper level is used more for bombardment of the convoy – through the holes in the ground grenades and missiles might be thrown at the truck(s) or whatever other enemy is below. The upper level is perfect for bombardment, since the heavy ground vehicles can’t shoot that high. So, for the Imps to advance safely, they need to secure those caves, especially in the upper level.
Hazards and cool stuff that could be done in this map (if possible):
- There is only one main road, where the vehicles might go, but many, MANY small caves for the infantry.
- The truck(s) is(are) quite durable vehicle(s). And it needs to be driven by a player – this way it can stop and continue when the next portion of the path is clear. And don’t forget that the truck(s) is very slow - maybe even slower than walking on foot (for the infantry to be able to keep up the pace).
- The ceiling of the main path is quite high – the heavy ground vehicles can’t turn their cannons that high. On the other hand, the infantry there has a good view over the entire convoy in the area. That’s why it’s essential to secure those caves.
- Don’t underestimate the Rebels tanks as well. They can easily tear the truck(s) armor if neglected. Also, they can approach from the front as well as from the back (because they can spawn from every CP safe from the truck(s)’s and the Imp fortress’s).
- The small caves are full of Speleothems (stalactites, stalagmites, stalactons (the columns), etc.), that can be used for cover. It will be cool if they can be destroyed after a few shots or if a grenade explodes. And it would be even cooler (and fun!) if one of them falls on some player’s head, it would kill that player.
More about speleothems here: http://en.wikipedia.org/wiki/Speleothem
- Those speleothems would be near the edge of the main road as well (look the pod race in Episode I (the movie or the game Episode I: Racer, the Tattoine levels (I think there are some of those in the game)) – there is a similar environment: the track and beside the track are those stalactites and stalagmites).
- I think it’s a cool map, where the infantry is somewhat better than the vehicles, but vehicles can be a dangerous foe if neglected. Also, I think it’s a map that should be played by a lot of people for a really good game.
Rebel Surveillance Post - full description coming soon!
Tiny map, good for playing when there are not many people on the server. It's a small Rebel space station used for surveillance of the Imperials, which is boarded by Imperial stormtroopers from a shuttle. The Imperial's goal is to copy to a datapad Rebel's database and then the Imperial ship will destroy the station with its cannons.
Brelor: Assault on Dodonna's mansion - full description coming soon!
Brelor is the moon of Commenor. It was given by the Galactic Empire to Jan Dodonna as a retirement home. Some time later Empire's COMPNOR tried to assassinate him. Mon Mothma learned of the assassination attempt and send troops to extract the him. This map is about that battle - the Imps goal is to assassinate Dodonna, the Rebs is to protect him and escort him to safety.
6) Deathmatch - the CPs cannot be retaken and there is no neutral CPs. The only way to achieve victory is to drain the enemy's tickets.
Possible Maps (with a short description before I write the full one):
Abregado-Rae: The Old Patch - full description coming soon!
A map resembling Venice - lots of channels which is a perfect opportunity to add some small boats and other naval stuff.
Space Coruscant: Liberation of Coruscant - full description coming soon!
A huge space battle with lots of ships and space stations (both military and civilian). Destroy an enemy capital ship or military space station and you will remove some of the tickets from the opposing team. But destroy a civilian ones and some tickets will be removed from your own team. Every capital ship and military space station is used as a CP.
7) Duel - it's exactly what you read - two players against each other. Usually without any vehicles. Sometimes only some of the classes and/or weapons are allowed (for instance: Yinchorr: The Squall).
To win the game, you need to win enough rounds. This Mode is just like the Duel Mode in other games.
Also, there might be a time limit, i.e. if the battle drags too long it will end with draw, victory for the person with most health, victory for one of the players (randomly), or some other way... Probably it'll need some research to choose the best option.
Possible Maps (with a short description before I write the full one):
Tatooine: Mos Eisley Spaceport - full description coming soon!
Actually any spaceport will do. But the idea came form JK3 level (again!). But not the whole level, but just one of the landing pads - put a ship in the middle and some boxes in the sides for cover and here you have it. A small nice map.
Hyperspace: The Millennium Falcon - full description coming soon!
There is no story for this level and it hardly can be done. But do you really need a reason to fight in the legendary Millennium Falcon? As a bonus, you can hide in the secret compartments, that is if you can find them! You can enter them like a normal vehicle, but from there you can't see what's outside, just hear the noises.
Map of the MF: 
Yinchorr: The Squall - full description coming soon!
The Squall is the arena where the Imperial Royal Guards trained (sometimes to the death!). The only allowed weapons are for hand-to-hand combat, i.e. vibroblades and stun batons (but if you add some other weapons... *cough, cough*: http://starwars.wikia.com/wiki/Emperor% … ibrosword).

You really don't need me to sketch it!
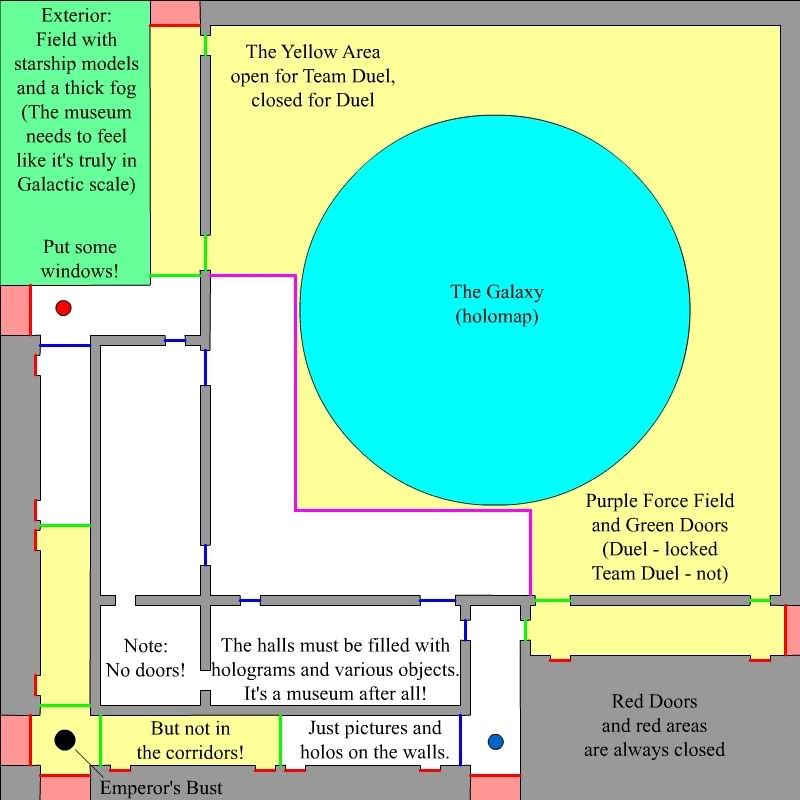
Coruscant: The Galactic Museum - full description coming soon!
Won't it be fun to fight in a Museum - break things, hide and shoot from inside a hologram,... study Galactic History,... and... learn Astrography... maybe? You start in a small corridor, your opponent in another corridor on the other side of the map. And you advance towards each other. There are four small rooms and one big one, where a hologram of the Galaxy is shown (just dots in the air, pretty much like in Episode 2). It's a map where you'll learn to thoroughly check every corner and hologram or otherwise you might find yourself caught in a deadly ambush!
Ylesia: Stormy Dogfight - a starfighter dogfight in the stormy atmosphere of the planet Ylesia. The rain, lightnings, turbulence and the poor visibility and the many dense clouds make flying straight a real challenge not to mention fighting. But if you win you can truly call yourself the best pilot in the Galaxy... just behind Han Solo......
8) Team Duel (Elimination) - Similar to the kill all of your enemies an without respawn. The difference is that it's played in rounds: to win the round your team must eliminate all of members of the opposing team and not be eliminated themselves. It's played until one of the teams wins enough rounds, e.g. the first team to win 5 rounds wins the game. Or the game is played till 10 rounds. There might be a time limit just like in the normal Duel.
9) Stealth - explanation coming soon!


