


Topic: FS Uprising
Map Name: FS Uprising
Planet: Jossin, an oppressed industrial dwarf planet on the outskirts of the Galactic Empire.
Ground/Space: Ground/Urban.
Weather/Lighting: Dawn. Cloudy, but almost full (mid-day) lighting.
Layout Diagram
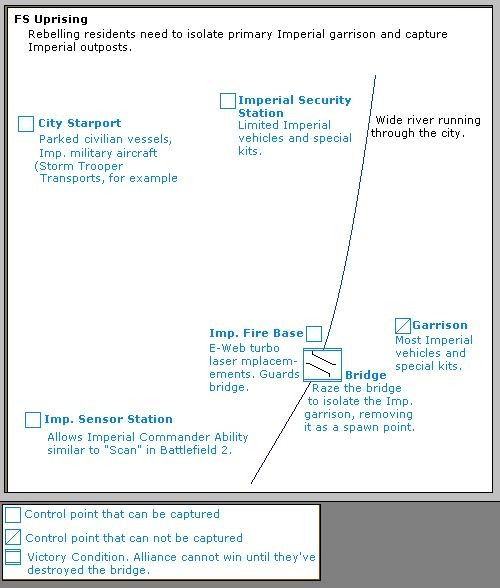
Map description:
The outer boundaries of Imperial rule are far from stable, subject to piracy, smuggling, crime, and even revolution from the people under Imperial control. On the dwarf planet of Jossin, tension has been increasing for years, leading to terrorist attacks and brutal reprisals from Imperial authorities. Only three weeks ago, the Imperial garrison in the relatively large 800 000-people city of Taelev uncovered evidence of an uprising in the making. An underground group has covertly been training soldiers, equipping them with weapons smuggled in from off-world, and carrying out attacks on infrastructure and Imperial assets. They now feel ready to being an assault to wrestle the city from Imperial hands.
The Empire wants this threat eliminated, and has declared martial law. As all residents are ordered to go inside and underground, the Imperials take to the streets, surrounding the city and increasing the rate of armed patrols. If order can be kept for long enough, reinforcements will be able to make it to the scene. The city will be turned upside-down, and any and all resistance fighters will be executed.
The city must be taken before then. With no hope of escape and time rapidly running out, the Resistance Command orders an all-out attack. The battle is about to begin.
Imperial Objectives: Maintain order until reinforcements arrive. Hold onto all assets. Anyone caught outdoor is to be considered a revolutionary and shot on sight.
Resistance Objectives: The city must be secured before reinforcements arrive. The Imperial garrison east of the river must be cut off from the battle and all Imperial assets on the west side must be neutralized.
• This is a standard Conquest/Assault Map.
• The entire map is a city, with everything from tall buildings to a large residential area in the center near the river with narrow alleyways and old streets (I draw inspiration for this "old city" from the Old Bergen district of my own hometown). A river runs through the city, separating the Imperial garrison, where most vehicles and special kits can be obtained, from the rest of the city. A partisan attack has already destroyed one of the two bridges across the river, so the bridge to the south, marked on the map, is the sole connection the Imp. garrison has.
• The Uprising army has no home bases per se. Their only initial insertion point is a "spawn point" that spawns them at random locations throughout the residential area. As such, to organize attacks, the resistance need to rely on mobile spawn points and squad leaders for insertion.
• The Resistance is badly under-equipped compared to the Imperials, and have to rely on ambushes, guerrilla tactics, and improvised equipment to succeed. Certain rooftops and other high-elevation areas have been made inaccessible to ground forces by means of barring doorways and destroying stairs and elevators and thus need to be spawned onto (by choosing the sole Resistance spawn point). The Imperials need to utilize air transports to reach them.
• Most of the Imperial forces come from the garrison across the river. If the bridge is destroyed, the Imperial forces will find themselves without most of their vehicles.
• The Security Station was originally used by the city's police force, but is now an Imperial outpost. It provides the side that occupies it with some vehicles and special kits. If the Imperials lose both this and the bridge, they're completely without ground vehicles and special kits, and the Resistance will have an advantage.
• The Star Port is the source of all the map's air units. The Sensor Station has equipment that allows use of certain Commander abilities.
Game-play Description: Each control point in the city, as well as the bridge, has a special purpose. For example, the Star Port is the source of all of the map's air units, while the Sensor Station allows for Imperial Recon abilities to be used. Therefore, this is not just a map of capturing control points because of their location and because holding more than half of them causes ticket drain to the enemy; the Rebels need to plan long-term and determine what's their highest priority. For example, they could start with taking the Security Station to the north, in order to get their hands on better weapons and some vehicles. Or they could take the Space Port, to avoid those pesky Imperial Storm Trooper transports that keep landing stormies on buildings, disrupting the fire bases. Likewise, the Imperials need to determine which bases are the most important to hold onto.
Vehicles: AT-ST and AT-PT walkers, Storm Trooper Transports and/or Assault Transports, Speeder Bikes. The resistance has some civilian vehicles such as land speeders and perhaps Swoop bikes. The Star Port has a variety of parked ships from shuttles to freighters, such as the Action Transport.
Extra notes: At the moment, I can't think of a reason for the Imperials to enter the Residential Area. I don't feel like putting control points there, and it'd be unrealistic to have the Resistance control point "captureable" as it represents a multitude of places to spawn, rather than a single location that can be captured. Maybe if there was a hidden Resistance hideout or two throughout the district that could be captured, that'd help.
I'm also unsure if the garrison across the river should be a spawn point even after the destruction of the bridge, and whether or not there should be a Fire Base on the other side of the river, defending the bridge from attack. The compromise I'm leaning towards is to have a small BF 2-like fortress of a tower or bunker or something with an E-Web turbo laser or two, but to not have it as a spawn point.
--the awesomeness that is Boatmurdered.