[img]http://psudo.us/i/X.gif[img/]
i hope that helps since what i said was a little confusing and when i came back to reply i didnt even understand what i wrote! yikes
i got this handy little guide just for you tiepilot!
i read through it, some parts are confusing but i hope you get the point
Part 1: The Basics
The Range of Each Number
- - -
- 1 -
- - -
Every number tells how many mines are in the 8 grids around it.
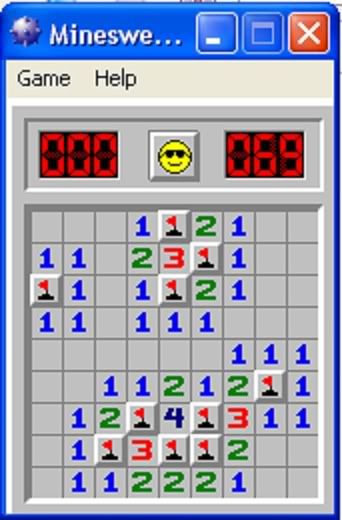
The game area is a big grid of possible mines. When you click on them, it shows you what was hidden there. If it's not a mine, it's a number. The number refers to how many mines are in the 8 squares around it: up, down, left, right, and the 4 diagonals. If there are no mines in any direction, that tile is blank and the eight surrounding tiles (which are all safe) are also exposed. If any of the surrounding blocks is a space, the blocks surrounding it are cleared too, and so on and so on.
In solitaire variants of the game, the object is to find and click on the safe areas and mark (back-click) the mines. In multiplayer versions, the object is to click on the mines. These two different gameplay modes have entirely different strategies. For now, I'm going to focus on the multiplayer version. If you botch the single-player strategy, you don't necessarily have an audience laughing at you for it. =]
After one click... - - - - →
becomes
→ 1 1 1 -
- - - - 1 1 1
- - - - 1 1 1
- - - - - 1 1 1
Some Obvious Mines * * *
1 1 1 2 1 2 3 2
1 * * 2 *
1 * 1 1 * * * 1
1 1 1 1 2 1 * 3 1
* 1 1 1
The whole point is to figure out which spaces are mines. Sometimes it's pretty easy; like, if there are the same number of unknown spaces surrounding it, like those in the figure to the right. It might be helpful to memorize some of the patterns you see this way so you can recognize them on sight, out of habit. In single-player mode it'll help you keep your time down, and in head-to-head mode it's better for you recognize them than your opponent. If the mines aren't so easy to find... well, that challenge is what makes this game fun!
Part 2: The Process of Elimination
Eliminate the Impossible 1 1 1 1 →
1 1 1 1 →
1 1 1 1
* S S * * S S *
1 * →
→ 1 * →
→ 1 *
1 2 3 1 2 3 S 1 2 3 S
* * S * S * *
If there aren't any obvious mines, you can try the process of elimination. Find numbers that already have that many mines around it. If you already know where all the mines for a number are, then all the other unknowns around it cannot be mines. So mentally mark all the unknown spaces around it "safe". (We'll use S to mean "safe". In the game, though, you just remember which ones are safe.) After you've eliminated the safe spots, whatever is left must be where the mines are. If the number of spaces left over is the same as the number of mines yet to be found, they must be mines. Congratulations, you're using your brain now!
Another way you can eliminate impossibilities is to guess where a mine might be and see if that makes any nearby numbers into liars. If it does, then there is definitely not a mine there; the numbers never lie. This technique is rarely useful unless it makes a liar out of a number that is a relevant distance away; you need to take the time to work it out.
Figure 1 - - 1 * - -
- - - - - -
- 1 1 1 B -
- 1 1 1 1 1
- - R 1 1 1
- - - - - -
In this example, either the R is a mine, or the B is. But how do you tell which one?
Figure 2 - S 1 * - -
S * S S S -
S 1 1 1 B S
S 1 1 1 1 1
S * S 1 1 1
- - - - - -
Here's what we know if the original B from Figure 1 is the mine. Wait! The 1 at the top has 2 mines next to it! That's impossible! Which proves the B cannot be a mine, which in turn proves the original B cannot be a mine.
Figure 3 - S 1 * - -
* S S S * -
S 1 1 1 S *
S 1 1 1 1 1
S S R 1 1 1
- - S S S *
Here's what we know if the original R is the mine. Nothing wrong there, it works great with the 1. We've found the truth, we've found 5 mines, and we didn't have to click on anything to do it!
Part 3: Playing The Odds
Basic Odds 1:5
- -
- 1
- -
1:4
- *
- 2
- -
1:3
1 -
- -
2:5
- -
2 -
- -
1:2
1 -
1 -
3:5
- -
3 -
- -
2:3
- -
2 -
3:4
- *
- 4
- -
4:5
- -
- 4
- -
No matter how good you are at figuring stuff out, sometimes in minesweeper you just have to guess. It's inevitable, like politicians lying or your mother pulling out the baby pictures when you bring a date home. (hint hint, mom) Anyway, even when you have to guess, you can still do it strategically and help yourself out.
As you might remember from math class, odds and probabilities are measured lots of different ways. We're going to remember them as ratios, like 1:3 for 1 mine in 3 unknown spots. If you have to guess to find a mine, you want a ratio that is as close as possible to 1:1, perfect odds. You read ratios by saying "in" where the colon is; 2:3 is read "two in three" and means 2 mines in 3 unknowns. The closer the first number (the numerator) is to the second, the better the odds. Also, the bigger the second number (the denominator), the worse the odds. 1:3 < 2:3, but 1:3 > 1:4. It's the same trick as fractions, if that helps any.
Take a look at the example to the right. There is no clear next move, no easy or definite mine. So we calculate the odds and guess where we have the best odds. The 1 says that there is a mine in the 3 -s around it (1:3 odds), and the 2 has 2 mines in the 3 -s around it (2:3). 1:3 or 2:3? 2:3 is better odds, so you'd want to guess one of the mines around the 2 where it's more likely you'd hit a mine.
2 - - -
- - - 1
That's easy enough when both ratios have the same denominator (number after the smile or the same numerator (number before the smile, but what about the example to the right? The ratios are 1:2 for the -s and 3:5 for the -s. Which is bigger, 1:2 or 3:5? If you can't tell right away, then toss them into a calculator and see. 1 ÷ 2 = 0.5, 3 ÷ 5 = 0.6 so because 6 > 5, 3:5 is the better odds. After you've figured them out with a calculator a couple times, you'll just remember. Practice makes perfect.
2 - - -
* - - 3
- - - -
But what are the odds when you're guessing without any information at all? This situation comes up the first turn of every game and every time you have to choose between guessing where you have a little information but not very good odds and guessing where you have no information at all. And the answer takes just a little math. Count how many squares wide the map is, then how many tall, then times those two numbers together. (For MSN's Minesweeper Flags, it's 16 × 16 = 256.) Then divide by how many mines there are (Minesweeper Flags has 51, so 256 ÷ 51 = 5.0196.) The odds of hitting a mine are about 1 in that number (so about 1:5 for Minesweeper Flags).
Usually it's pretty bad odds, so unless you're looking at a 1 surrounded with -s, it's probably a good idea to play where you have some info. That's not true for all versions of Minesweeper, and it's less sure as more area becomes known. If a lot of area is known but not very many mines have been found yet, you might want to count up all the unknown spaces (excluding safe unknowns) and divide that by the number of mines that are left. It might have changed a little. It's always a good rule of thumb that if you don't know for sure, check the math.
If this section was hard to understand, try reading it again or talking to a math geek about ratios and probabilites.
Part 4: Increasing Your Odds
Sometimes you can find definite mines by eliminating the impossible, but sometimes you can't. Even so, you still increase your odds by eliminating the impossible even if you can't be completely sure.
#1 1 -
* -
2 -
1 -
- -
#2 1 S
* S
2 -
1 -
- -
#3 1 S
* S
2 -
1 -
- -
Take the example to the left. In #1, there aren't any good moves. The 2 gives 1:3 odds, which isn't bad, but maybe it can be improved on. The 1 at the bottom is practically useless, 1:4 odds. But we can use the top 1.
In #2, we've eliminated the two top-most possibilities because the top-most 1 already has it's mine. That eliminates one of the three possible spots for the mine 2 is looking for. Now the odds are 1:2 instead of 1:3 (as shown in #3). We didn't locate a mine definitively, but we did bend the odds in our favor. That gives us an edge over some other player who didn't think it through.
Sometimes eliminating possible locations for a mine can help dramatically. In figure #1 to the right, there are 9 possible mine locations. Watch as we eliminate all but 2.
First, the easy part. Two of the 1s already have mines next to them. Six of the possible mine locations are easily eliminated because there can't be another mine near either of those 1s.
#1 * - - - *
1 - - 2 1
- 1 - - -
Now we've got a little more thinking to do. The 2 already has 1 mine next to it and has 3 possible mine locations next to it. The 1 on the bottom row has two possible mine locations...
#2 * S - S *
1 S - 2 1
S 1 - S S
Since there must be a mine in one of the lower two possible mine locations (for thus says the 1), the 2 becomes helpful. There's one mine already located near the 2, and another in two of the remaining spots. That's all the mines the 2 can handle, so the remaining spot cannot be a mine. We can mark it as safe.
#3 * S S S *
1 S - 2 1
S 1 - S S
That's dramatically helpful, eliminating 7 out of 9 possible positions for the mine. The odds on the 2 alone went from 1:6 to 1:2. If you use this process of increasing your odds every time, you'll locate mines more often, get higher scores, and win more games of Minesweeper Flags.
Part 5: Compound Odds
The final level of strategy (or at least the final one I've been able to figure out) is when two bits of information overlap, but they don't definitively prove or eliminate anything.
- - - 1 1
- - - * 1
- - 3 - -
- 4 - - -
- - - - -
Here's an example. The 1s eliminate a couple of spaces, but the odds for the 3 are 2:4 and for the 4 are 4:7. You can see 4:7 is slightly better odds than 2:4, so you'd want to pick something around the 4. But is it better to pick something that's also near the 3? (Assume the odds for unknown areas are 1:5.)
The math behind this says 1 - ((1 - ProbabilityA) * (1 - ProbabilityB)) = Probabilityfinal. So, in this case, that means 1 - ((1 - 2/4) * (1 - 4/7)) ≈ 0.786 for the ones bordering the 4 and the 3, and 1 - ((1 - 2/4) * (1 - 1/5)) = 0.6 otherwise. That shows it's a slightly (≈0.186) better idea to choose the ones bordered by both.
But that's a LOT of math! Isn't there a shortcut? Yes. And you love me for showing it to you. Admit it. =]
First, split the spaces around the 3 into two groups, those that also border the 4 and those that do not. I'll call the groups 3(4) and 3(alone). Both these groups have two sets of odds affecting them; 3:4 from the 3 and either 4:7 (for 3(4)) or 1:5 (for 3(alone)). If we look at only the odds that are different between the two groups, it's easy to see that 4:7 > 1:5. That being the case, 3(4) has better odds than 4(alone). In another situation where everything was the same except there was a 1 where the 4 is now (like the figure to the right), we'd be comparing 1:7 < 1:5 and we'd want to pick away from the 1.
- - - 1 1
- - - * 1
- - 3 - -
- 1 - - -
- - - - -
This is the most advanced, most math intensive section. But even it becomes simple with practice. Keep working on these same principles, keep playing the odds, and it'll get easier and more obvious to you. In time, you'll be able to score higher, win more often, and generally be in more control in any Minesweeper game. But, above all, have fun with it!


